The sewing machine is a functional and reliable assistant for those who prefer to produce high-quality products on their own, both for themselves and for sale. But she, like any equipment, periodically needs repair and adjustment, the implementation of which is best entrusted to an experienced specialist. If there are none nearby, then this can be done with your own hands, because the process is not particularly complicated and requires only attention and accuracy. How to set up the sewing machine yourself and what rules should be followed?

How to set up the device?
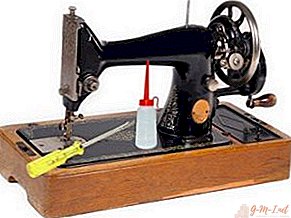
Old models are striking in their endurance and durability - despite their venerable age, the quality of their work is not inferior to modern products. Proper setup of the sewing machine depends on an understanding of the principle of its operation:
- A winder (wheel) is mounted on the right side, which is manually actuated. A nearby lever is used to adjust the stitch length.
- A shuttle is fixed on the left, and next to it is a presser foot with a needle.
- Material advancement during sewing is ensured by laths fixed on the working surface.
First of all, you need to select the numbers of needles, as well as threads, which will make it possible to work with all kinds of materials. In addition, you should pay attention to the line, but before working, you need to carefully study all the settings, only then you can determine which line is better to choose. The thread, which is pulled from below, is regulated by the screw installed on the bobbin cap, and the upper thread is located near the lever lowering the lever foot with a special regulator.
What parameters can be adjusted?
The need for setting when using sewing machines at home often arises when the numbers of threads and needles are incorrectly selected with respect to the material being processed.
NOTE. Working with coarse material requires a higher needle number and a lower thread number. When sewing thin material, on the contrary, you will need a higher thread number and a lower one - needles.
The main parameters that are available for self-adjustment are as follows:
 Stitch length For classical material, the value is 2 mm, for thinner - stitching is performed more often, and for coarse - less often. The maximum stitch length is 4 mm, which varies with a special knob with a digital scale. If it is locked in the upper position, the fabric will not be fed, so during operation it should be lowered down, which means a longer stitch.
- Feed fabric in the opposite direction. You can sew not only in the direct, but also in the opposite direction, in which the material is fed to the master. Switching is performed by a regulating lever, which is set to a certain position. The stitch length does not change, and switching in the opposite direction occurs without removing fabric and stopping sewing.
- Adjustment of foot pressure. The value changes, as a rule, when working with especially light and silk fabrics, which require a slight decrease in foot pressure. With coarser materials, on the contrary, it is necessary to increase the downforce. Adjustment is made with a dial screw.
 Stitch length For classical material, the value is 2 mm, for thinner - stitching is performed more often, and for coarse - less often. The maximum stitch length is 4 mm, which varies with a special knob with a digital scale. If it is locked in the upper position, the fabric will not be fed, so during operation it should be lowered down, which means a longer stitch.
The sewing quality is also influenced by the thread tension - ideally, both threads are intertwined in the middle of the fastened fabrics. The line from the bottom as well as from the front should look the same.
The process of tuning the sewing machine PMZ
The PMZ sewing machine is noteworthy in that it confidently copes with any fabrics, regardless of their density and thickness. For this reason, it is still popular among masters, despite the fact that the model is quite old. Podolsk manual machine is in the house of many. For the correct and effective operation of the machine, you must correctly configure it:
- The device for winding the thread is located on the rear side of the product, near the flywheel, to which the tensioner is also attached.
IMPORTANT. When threading the thread, the flywheel wheel is switched off, which eliminates the possibility of work. This is done by twisting the friction screw onto the master.
- A bobbin is installed on the coiler.
- A spool of thread is fixed on the rod.
- The thread is pulled under the washer of the tensioner and pushed up to the bobbin.
- The frame at the winder is pulled down to the contact of the rim of the pulley and flywheel.
NOTE. Until the end of the procedure, you need to constantly hold the free edge of the thread, which guarantees smooth winding.
The bobbin is mounted in the cap so that the oblique slot remains on top - through it the thread will stretch to the spring and again exit through the end slot. The whole structure is fixed in the machine and the shuttle device closes.
To fix the needle, the needle bar is set to the upper position. In this case, the blade groove is turned to the right, and the flat side of the bulb is turned to the left. Next, the thread-pulling lever is fixed in the upper position and the upper thread is started, and the flywheel turns to the master. Refueling is carried out from the reel and to the eye of the needle. The lower thread is pulled out when the handwheel is turned, which makes it possible for the needle to lower and grab it from the shuttle, and then rise up.

It is also recommended that you familiarize yourself with the following important points:
- To avoid tangling the thread in the shuttle will allow the rotation of the flywheel from him - on the master.
- While idle, the presser foot rises.
- When the machine is turned on, the fabric should be under the foot, since otherwise the teeth will become dull.
- When working, pulling and pushing matter is strictly forbidden, because the needle is fragile and can break.
- The plate located above the shuttle must be closed.
Old models do not have a bobbin hold-down spring installed in new machines. A small trick will help to fix this - a paper or fabric circle is cut, the diameter of which is slightly less than the diameter of the bobbin, after which an axial hole is cut out in it. Further, the circle is fixed in the bobbin case, lubricated with machine oil and the bobbin is fixed there.

Basic rules for doing your own DIY setup
Perform self-tuning for even an inexperienced person. To do this, adhere to certain rules:
- First of all, you need to adjust the spring that lifts the thread. It is twisted to a position that will make it impossible to unwind the thread when securing the bobbin.
- Optimum thread tension should be ensured by mechanisms in the interlacing shuttle screw and on the front of the device.
- The operability of the machine is checked, for which an unnecessary fragment of matter will be required. After work, the line is inspected - if hanging loops are found in it, then the upper thread is pulled and it is necessary to loosen it. If the product is correctly set up, the seam should look even and have nodules in the middle that cannot be felt.
- The correct presser foot value is set, for which the spring is adjusted by tightening a special bolt. In most models, it is in an accessible place and rotates very easily so that you can quickly configure.
IMPORTANT. The bolt in the machine should not tighten too much, but also not be loosened. Too much pressure can cause a rupture of the fabric, and a weak pressure can lead to a curved seam due to insufficient pressure on the material.
- The operability of the electric drive is checked. Incorrectly set speed, which is performed by the regulator located in the pedal, leads to incorrect operation of the product. An incorrectly set sewing speed also impedes efficient operation - the machine sharply operates even with slight pressure on the pedal. Correcting deficiencies is necessary by removing, cleaning and reinstalling the pedal.
The final preparatory step is to check the needle holder, the set stitch length, the sharpness of the fixed needle, and also its compliance with the selected fabric. You can even configure an old manual machine.

How to set up a sewing machine after prolonged inactivity?
If the device has stood idle for a long time, then its use should be preceded by tuning and cleaning. This is required to check the operability of all mechanisms and elements, the absence of rust on them. To do this, the old manual machine must be disassembled, all its components are treated with machine oil. After that, the machine is assembled back and idle driven at low speed, which will allow the oil to evenly cover parts.
IMPORTANT. In the necessary order, the needle is replaced and only then is the thread threaded.
Unnecessary material is taken for the first start, as drops of engine oil can seep and fall onto it. If the line is laid correctly, then you can confidently start work.

Leave Your Comment