Why should an ozonizer be made and what is it? Let's start in order. Ozone is one of the options for the existence of oxygen in nature, consisting of a combination of three atoms. Under normal conditions, it looks like a blue gas. It was discovered by the Dutch physicist M. van Marum in 1785 as a result of experiments on passing electric sparks through the air. The term "ozone" (Greek smell) was proposed in 1840 by a chemist from Germany X. F. Schönbein.
The properties of ozone are such that when it decays, a large number of active oxygen molecules are released, adversely affecting pathogens, fungus, viruses, which contribute to the speedy healing of wounds. To create ozone in the room, household appliances - ozonizers were developed.
When assembling an ozonizer with your own hands, you need to remember that ozone is produced in three ways:
- In case of passing through oxygen O2 powerful electric discharge - the easiest and most common way.
- In the case of exposure to O2 by powerful ultraviolet radiation.
- As a result of synthesis in the presence of catalysts, the least common method due to the high cost of chemical reagents.
Scheme for the manufacture of a homemade device
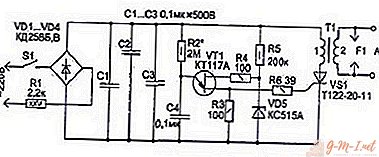
On the diagram
| Title | Face value | Qty | Note |
| VT1 Bipolar Transistor | KT805AM | 1 | |
| VT2 Bipolar Transistor | KT361A | 1 | Denomination with any letter |
| R1 Resistor | 100 ohm | 1 | 1-2 watts |
| R2 Resistor | 56 kΩ | 1 | |
| R3 Resistor | 1 kOhm | 1 | |
| R4 Resistor | 260 ohm | 1 | |
| R5 Resistor | 100 megohms | 1 | |
| T1 Transformer | TVS110PTs16 (TVS110PTs15) | 1 | From the tv |
| U1 Voltage Multiplier | UN9 / 27-1.3 | 1 | From the tv |
| Voltage Multiplier (DIY) | |||
| VD2-VD5 Diode | KTs105G (7GE350AF) | 4 | From e.g. up to 8 kV |
| C2-C4 Capacitor | 320 pF | 4 | From e.g. up to 20 kV |
Necessary tools and materials for creating a household ozonizer
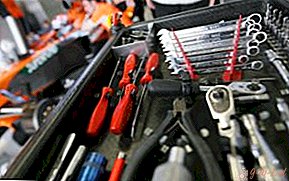 Of the tools you may need a soldering iron with tin and solder, pliers, a drill with a thin drill, a small tool like a knife and tweezers.
In addition to the 220 V power outlet, you will need:
- there is a lot of voltage converter, there are a lot of schemes for its self-assembly on the Internet, you can choose what kind of soul you want;
- inductive coil;
- a radiator through which ozone will be generated;
- case, so that the emitter would look like a full-fledged device, and also so as not to fit into your hand or any other part of the body where you should not fit.
All of these components can, if desired, be assembled with your own hands, if you have skills in radio engineering.
If you do not want to bother with the converter, a factory-made dimmer will do for these purposes. As an inductive coil, an ignition coil from a Lada or Zaporozhets is suitable, it only needs to be equipped with two capacitors with a capacity of 2 microfarads per 630 volts.
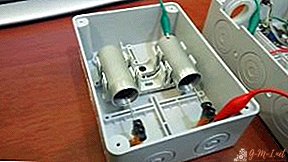
For the emitter, you will need the following details:
- two getinax plates with dimensions of 100X100X3 mm;
- four getinax strips with dimensions of 100X10X4 mm;
- two plates of aluminum 80X80X1 mm;
- glass 80X80X2 mm.
Plates serve as outer planes. In the central part there is glass, on top of which insulating strips are located on both sides. Above them are aluminum plates with terminals. The result is a design with a gap between the plates, where ozone will be created due to corona discharge. When assembling, contact between aluminum plates should be avoided.
You will also need high voltage wires and insulators. The case is assembled from available materials or purchased in a suitable size after successful testing of the device.
Sequencing
 Before you start using the assembled device, make sure that it is working properly. Firstly, a working device emits a characteristic sound of a working transformer, crackling. The second - when working in the gap of the emitter, a weak glow of a bluish color should appear. And third, the characteristic smell of ozone should be in the air.
During operation:
- Processing the air in the room, the unit turns on for 20-30 minutes, and it is necessary to leave the room.
- Upon returning, the appliance is immediately de-energized, and the room is ventilated.
- It is forbidden to use ozonizer in wet rooms, as well as containing a large amount of conductive dust.
Important! It is necessary to exclude children's access to the ozonizer.
Useful recommendations on how to correctly and quickly make an ozonizer
If there is no experience as an electrician and radio engineer, the most useful recommendation would be to go to a household appliance store and buy a factory-built ozonizer. If everything is not so bad with skills, then before assembling the unit, you should familiarize yourself with the design of ready-made devices, and take a ready-made working scheme instead of inventing a bicycle. The ozonizer belongs to high-risk devices, so it is better to learn from the mistakes of others than from your own. The time spent on familiarizing yourself with the finished, working devices will pay off with interest.
Important nuances of assembling a homemade homemade ozonizer
 The most important point is the assembly of the emitter. It is necessary to correctly select insulating materials, and also make sure that the aluminum plates of the emitter do not contact each other, otherwise a short circuit may occur with the ensuing consequences.
Without fail, the finished device is mounted in a durable, non-conductive case. The question here is no longer about aesthetics, but about the safety of ozonizer operation.
An important nuance is the qualification of a person collecting an ozonizer. The assembly of such electrical appliances by an amateur is strongly not recommended, otherwise things may not come to an improvement in air - you will need to heal the collector himself.
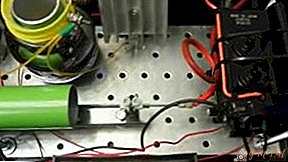
Instrument installation rules
Installation is carried out in the following sequence:
- mains power;
- voltage converter with a capacitor at the output;
- low voltage coil winding;
- on high voltage wires, the power comes to the second capacitor, and then to the emitter.
Air is forced into a vertically mounted radiator by a fan.
Do-it-yourself safety precautions when making an ozonizer for your home
 As already described above, the assembly should be carried out by a qualified specialist, ideally an electrician with a 4 tolerance group. The general safety requirements should not be neglected:
- Do not assemble the device and install individual elements while the power is on.
- Do not use a defective or uninsulated power tool.
- Avoid contact with wet surfaces and ozonizer elements at the same time.
- Use a standard power tool.
- Do not use the so-called "bugs" as fuses, that is, emergency fuses of handicraft production.
- Make sure that the outlet and wiring are in good condition and reliable.
What is the difference between an ozonizer made in an industrial environment from a homemade device
 The differences between home-made devices from industrial ones for each specific case are different. It is worth starting with the fact that the factory-assembled ozonizer is manufactured according to a specific, run-in scheme and meets a number of requirements regarding operational safety. It also has the declared parameters - power consumption, performance, and is equipped with clear operating instructions, has a warranty period. However, its price can be many times higher than the cost of the elements used in a home-made device. And it is far from a fact that the performance and reliability of a factory device is superior to a home-made one.
Pros and cons of homemade household ozonizers
The fattest plus in the manufacture of a home-made device is its low cost compared to the factory counterpart. Sometimes the difference in price may not even be several times, but tens of times. Further - with a competent approach, you can assemble an economical in terms of energy consumption, safe to operate and efficient device. The third plus is complete freedom in terms of design. You can assemble an original, stylish and productive device, one of a kind.
Cons - to assemble such devices with your own hands, you need rich experience and theoretical knowledge. There are no declared parameters, everything is often selected experimentally. There is no factory warranty and operating instructions - the nuances of the device are also checked in practice.
Leave Your Comment